Showing posts with label Review. Show all posts

Thursday, 20 February 2014

Review Thursday: Natural Collection Blush

Hey Guys,

It's Thursday which means a review post from me. Today I'm going to review the Natural Collection Blushed Cheeks. I love the Natural Collection eyeshadows and bronzers, so it was no surprise that I fell in love with the blushes too.


I bought my first Natural Collection blush a good 6/7 years ago and I'm still yet to hit pan, despite using it most days. The first one I bought was the colour 'pink cloud' which is a really pretty pale Barbie pink and then more recently I bought 'Peach melba' which is a darker slightly dirty pink.  


These blushes are a pressed powder which loosens up when applied to the brush, making them easy to sweep over the cheeks beautifully. The pigmentation is really good, especially with the 'pink cloud' colour, a little goes a long way for a natural flush or you can really build them up for a full impact of colour.

I really like how well they apply for a natural look, they also cling so well to the cheeks all day without loosing any colour. In the range there is only 4 colours, although I really want to purchase the other two, because at £1.79 there an absolute steal!

The only downside of these little pots is the white plastic containers, although this is the signature packaging for the brand, I'm not overly keen. I don't mind them so much however both my pans of product has fallen out there containers which makes travelling a little tricky. It would be good if I could make a blush palette and buy the two other colours.


 Peach Melba swatch


Pink Cloud Swatch


I would seriously recommend these to anybody as there perfect for everyday and night. Although there are only 4 colours the colour range is pretty good. I would also recommend checking out the eyeshadows and bronzers while your there too!

Saturday, 15 February 2014

#2014BloggerChallenge: Highend Vs Highstreet

Hi Guys,

Firstly I'll start with, I'm sorry I missed the last topic for this challenge, however I'm just not a reader. I mean I read blogs and articles but not an actual book, I think the last book I read was about 2 years ago. So to be honest writing a book review is a bit of a lost cause for me because it's just not my thing.

Now that's out the way, the topic for this week is all about highend vs highstreet. The way I've interpreted this topic is to kind of give my opinion of whether or not more expensive products are better than a cheaper version.

For me personally I'm very new to dabble in the higher end of beauty products because when I was a student it didn't even occur to me to buy like Mac or Nars, I just went straight to Boots to the Rimmel and Natural Collection stands. I've always been a cheap make-up user and have only really started using like Bourjois and Soap&Glory, which don't get me wrong not exactly pricy, but buying a £10 foundation never sat right with me. Although now I have a 9-5 job and the money I make is actually mine, I'm starting to branch out and spend a bit more on the products and experiment a little more. Like 8 months ago I had one foundation which I swore by, now I have about 4 or 5 with different coverages and different uses. You could go as far as saying once I left uni I went on like a make-up binge. Nowadays when popping into Boots I see myself browsing round the Mac counters and Smashbox stands more and more.

I think the main thing I'm getting at in the post is I am new to highend products so I can't really give a good enough answer to whether I think there better or worse however watch this space.

Although there is one thing I have definitely found an improvement in from using a pricier product, and that is make-up brushes. I never valued how a make-up brush could changed the way your make-up looked. My friend at uni always used MAC brushes and I just didn't see the big deal. It was only when I started blogging and saw people banging on about how important they are and swooning over one brush, I thought it was crazy, but no no no I was the crazy one!


The day I purchased a Mac 217 brush changed my life, I know big statement, but wow it was a real game changer. I'm a lover of a smokey eye but I could just never master it, until this god send of a brush came into my life. I then went on to purchase majority of the Real Technique brushes, and my make-up has never looked so flawless. Gone where the days of buying a cheap set in the Christmas sale, although I'm not saying some cheaper brushes don't do the job I'm just very happy with my slightly more expensive ones. It's also safe to say that I am converted to a higher end make-up brush.

That's it for this post, I know it doesn't have a great amount of substance to it but I think if I were to revisit this topic in say 6 months time I'd have a bit more to say. I may do that like a part 2. I can't wait to read everyone else's posts and see there take on the topic, I'm pretty sure I'll end up with a massive wish-list from them all!

Don't forget to follow me on Bloglovin' and Instagram where I tend to post what my make-up looks like (selfies) and my nails, as well as day to day rubbish haha.


Thursday, 13 February 2014

Review Thursday: OPI Top This

Hey Guys,

Today I am going to give a review of this OPI collection I got for Christmas, my mum bought me this and I believe she bought it from TKMax, but I think I've seen it on nailpolishdirect too.
Anyways in the pack you get three full size OPI top coats, one normal glossy one, a glittery top coat called 'Snowflakes In The Air' and finally the one I've been lusting over for so long, a matte top coat.


This little set is so perfect as it holds my top three favourite nail effects. I love doing my nails, even though I have acrylics, I end up repainting every week because I enjoy it so much. I like to get quite inventive with my nails and end up going for the forth finger different colour/glitter effect. I'm a lover of bright pinks and oranges or masses of glitter, I'm a big glitter fan.

I've always wanted to buy a decent top coat, because I find drugstore ones never do a great job. However the price tag of one OPI top coat scares me a little so I just end up making do. I'm so happy I received this one and I've loved using it ever since. The bush is long and medium thickness which makes application really quick and easy, making any polish instantly glossy and protected.


Next up the glittery 'Snowflakes in the Air' is very a pretty silver based glitter with a holographic light hitting effect. The glitter itself is a mix of medium to fine glitter pieces although the polish is packed full of them. I haven't used this just yet because I also got a mini Mavala glitter in my Boots beauty advent, so I've been using that. However on the image below I've painted it on a nail reel on top of a white so you can really see the effect. The glitter itself when it hits the light is so pretty and I got this coverage in two coats. Although I personally tend to go for a higher coverage of glitter but I'm quite liking the glitter on white if I'm honest.


Finally my most anticipated top coat, the matte one. I've been wanting this for way too long, I'm talking like a year! About a year ago I started to see matte finish nails on Instagram and absolutely loved the idea although when having a look on the internet I couldn't find any for the life of me. I eventually found a few colours on Ebay from China but when they arrived they didn't turn out quite like I wanted. Until Barry M released there Matte finish colours which when I tried I fell in love! (see post here). After I tried these I was like I have to get me a matte top coat because I have so many colours which I'd love to try as a matte finish. When I unwrapped this on Christmas Day and I was so happy, I couldn't believe my mum even remembered I wanted it.


The application is as easy as a normal glossy top coat, with the brush easy to use and comfortable to hold. On application it comes out as a liquid and almost like a normal top coat until it dries and it's completely matte. I love the finish it gives and the durability is so long, although this could be because I have acrylics and they don't tend to chip. One thing I really love about this top coat is that it makes my nails feel so soft, because sometimes with normal top coats they can feel a bit grippy, this one is so velvety. Below is an image of the matte and normal top coat on top of a black from Barry M.


That's it for review Thursday I hope you've liked this post. If your a nail addict like me then this set is a must have. Although it's just top coats, do not underestimate the power of top coats! I feel they finish the nails off so nicely compared to not wearing any and just make the nails so much smoother. If you do like seeing nail pictures then I'm a regular guilty Instagramer for this you can follow me here. Anyways that's it from me, I'll be back soon :).

Thursday, 23 January 2014

Review Thursday: Ferne Eye Crayon

Hey Guys,

Welcome to review Thursday!
Today I am going to give my review on these eye shadow crayons by Ferne. This make-up is a collection created by Ferne Cotton sold in Boots. I never really buy from her collection simply from not even thinking about it, but I picked this little set up in the Boots when they has the Christmas 3 for 2 deal, I can't remember how much I paid but it was around the £8/£10 mark.


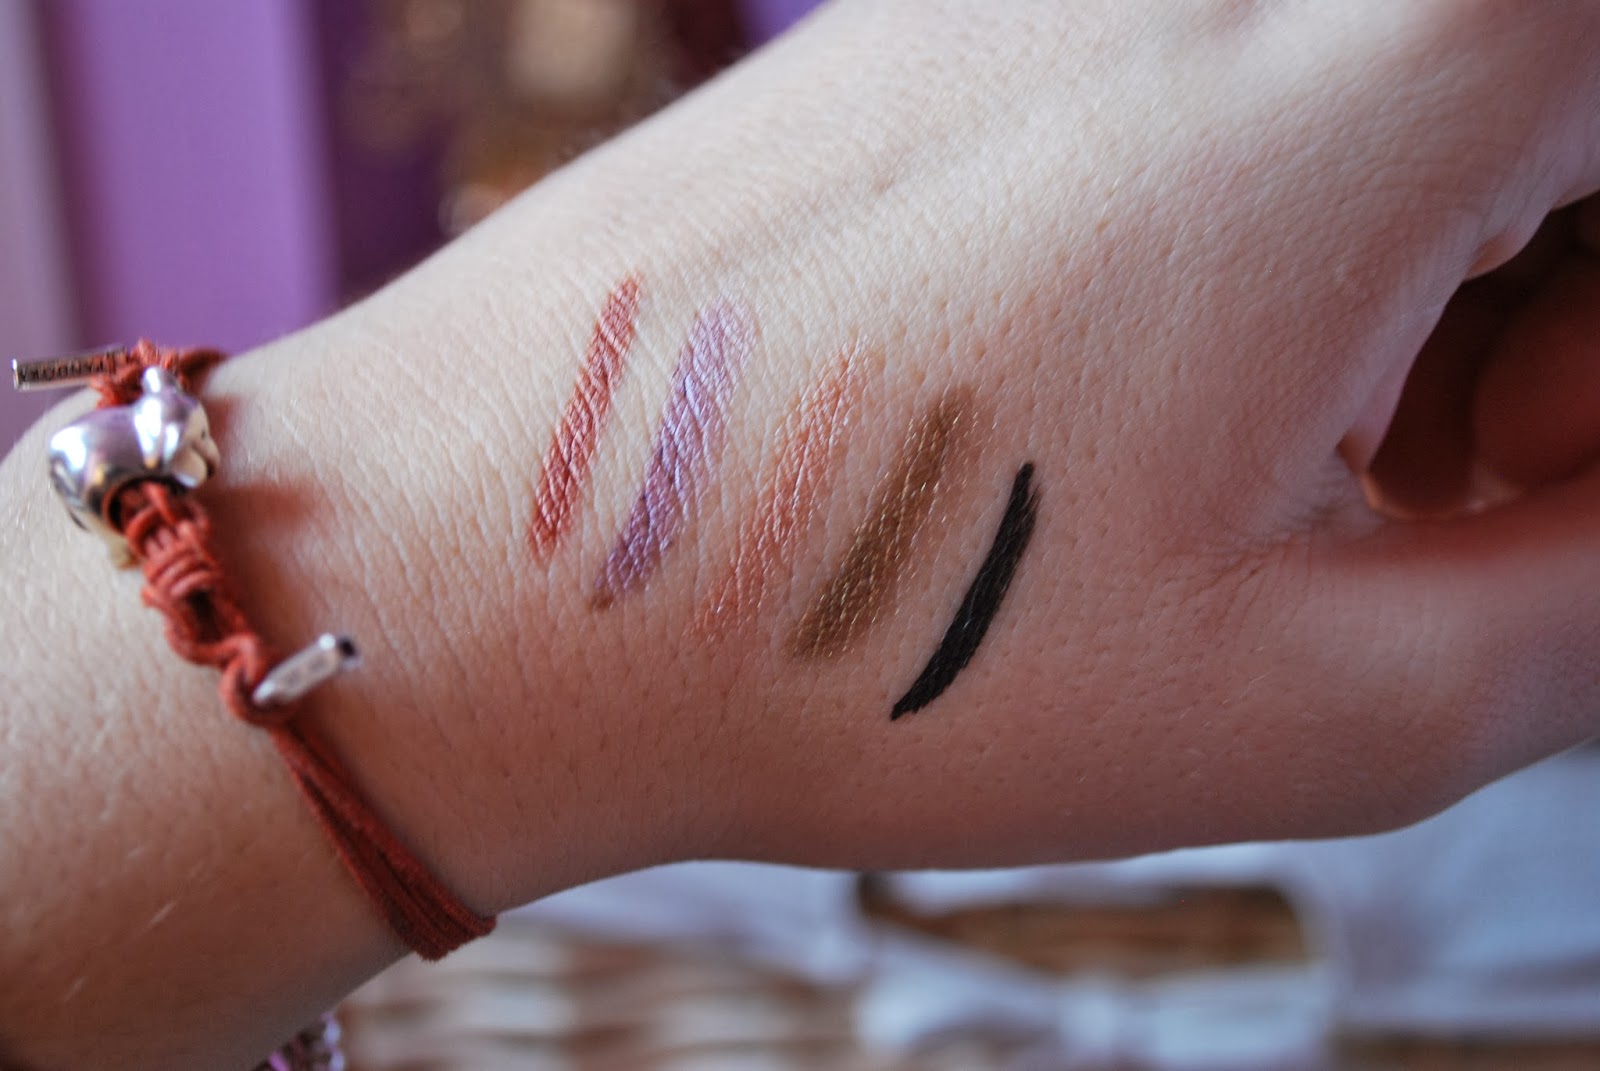
Within the collection there are four eye shadow crayons and a liquid felt tip eye liner.
They don't have any colour names but you can see below you get a green, champagne, purple and bronze colours which are all quite shimmery.


I picked these because I really liked the tones of the colours and I thought as there not to bright they would be good to use as a base for eyeshadow. The pigmentation is really strong and with one sweep the eyelid is covered. There really nice just worn on there own because they catch the light slightly looking like you have more make-up on than you do.

I really like the cute polka dot packaging and the way there a stick form instead of in a pot. The formula is a dry but creamy constancy making them not wet at all. They almost remind me of when a felt tip pen is running out, although there not so dry that they drag across the lid.  


I bought these mainly to use as a base so I could put shadows on top to make the colour really intense and develop them into a smokey eye. However after a few hours they really start to crease and wear off which is really annoying. I've found that if you only put a very light amount on they don't crease as bad but it's still pretty annoying to keep having to touch up.

As I found that they do crease over the lid, I haven't given up on them yet because I really like the colours! I've now started to wear them along the outer corners of my water line, like just underneath to give a slight shimmer to a day look.


The green and champagne colours are my favourite.


The felt liners quite nice too as it has a good fine tip and is really easy to apply, my only issue is, is that the darkness of the black doesn't last all day. Although it is good for a evening out just not a 9 hour working day.


I think thats all I have to say about these little crayons, a nice spontaneous find but to be honest I wouldn't recommend them, I think you can get a lot better in the drugstore for a similar price.


Thursday, 16 January 2014

Review Thursday: Seventeen Phwoarr Paint Concealer

Hello all!

How are we this Thursday? My week so far has been manic which I don't expect to change any time soon, but hey I like it that way!

Todays post I'm going to be giving my review on this Seventeen concealer.


I bought this concealer by accident to be honest, I was browsing my local Boots one day and picked it up just to have a look, then bumped into someone I knew and the next thing I know I've been to the checkout and it's on my receipt. However accidental purchase for the win, I love this concealer! 

The packaging isn't amazing but it's not bad and this little compact cost me £5.49, which I thought was quite a lot for number 17 brand. Nevertheless it's small and easy to carry about, it also has a fairly big mirror which really works for me. 


On the pot the product is described as 'heavy duty under eye concealer' and is suppose to 'wage the war on under eye circles'. The product itself is really thick and creamy with quite a dry formula until it hits the skin an melts slightly. The concealer works wonders by covering up any dark circles and leaving a dewy brightening effect.

The colour I got was in 'fair' which is a great colour match for me. The colour itself is fairly peachy but not overly pink. Which for me is good because my skin is quite pale and I don't have much redness at all. The colour of the concealer really matches my foundation too which is perfect. 


Previously I've never actually applied under eye concealer because to be frank I never knew you could do that. I know blasphemy. Till the beauty blogging world showed me the errors of my ways I now never leave the house without it!

When I first applied the product I though it was a bit light for my skin and made my dark circles looked worse. Although I found this was because I wasn't putting too much on as I was using a brush. So now I apply this product with my forth finger straight from the pot and blend out under my eyes. This works really well for me as my fingers melt the product which helps it blend and erase my dark circles.


Overall I would definitely recommend this product, the bad side is theres only two shades, medium and fair.  However if your lucky enough to get a good colour match then do go try it, I don't think you'll be disappointed!

Has any one else tried this concealer and love it as much as me?


Thursday, 5 December 2013

Review Thursday: Bourjois Rouge Edition Lipsticks.

Hey Guys,

This week I bring you a review of Bourjois Rouge Edition Lipsticks. I bought the red one back in summer then the pink one joined me just before my graduation a couple of weeks ago. I really really love these lipsticks and don't actually have a bad word to say about them so if you want a happy nice review then your in the right place.


I really like the square packaging, although it's just plastic they look really nice and sleek. I love that they have some of the colour in the bottom so you can identify them really easily. On the packaging on one side they have all the standard cosmetic details, a blank side, the Rouge Edition writing like you can see above and then finally a embossed Bourjois side which I really like.


They kind of smell like waxy crayons but not strong, so to me it just smells like lipstick. The colour of the stick transferred to lips is very true and the colours are good in pigmentation. The formula is very creamy and glides onto the lips but doesn't smudge so theres no need for lipliner. The colour is slightly glossy but not so like lipgloss so a pleasant shine which lasts for ages and ages. What I've found really great about these is that they're very handbag friendly, the lids don't fall off and they don't melt in heat like some creamy lipsticks can.

Let me go into a little detail about the separate colours. I'm sorry to say I don't have any swatches because the lighting just didn't pick up a very true colour but like I said before the stick colour is true to life.


Firstly the red, this is 10 Rouge Buzz. I bought this back in July and was my staple summer red, I love the orangy red tone. It's very bright, not too daring and easy to wear, I think a lot of skin tones what suit this shade. The slight shine it has doesn't make it too intense like some matte shades can and when it starts to wear off (after I would say a good 5 hours) it fades quite evenly and still carries a slight tinge. Although it's winter this is a must have for summer but I might try wearing it with an all black outfit.


My second colour is this dusty pink which is 17 Rose Millésime (which was featured in my November Favourites). I love this shade, it's such a wearable day and night colour. It's like a your lips but better but a bright version. I like that it can make a smokey eye pop or an everyday look brighten. Since I bought this shade it has never left my handbag. I will say that I'm not sure if it's for everybody because of the tone of pink, but if it's for you it's a big winner. For me I don't feel like I suit peachy pinks so this is a nice alternative.

I got mine from Boots and Superdrug where most Bourjois stands tend to have most of the shades. The rouge editions also have a shine series which contain a quarter gloss within the formula but I've never used any as I reach for the Bourjois Colour Boost range instead. Anyways you can get hold of these for £7.99 which is pretty good for what I would say is a high quality drugstore lipstick with good results.

That's it for my review on these Bourjois lipsticks, I hope you've enjoyed reading and it's come of some help to you. Have any of you used the Rouge Edition lipsticks, what were your thoughts?


Also I've been posting everyday over on my Instagram of what I've been getting in my Boots beauty advent calendar, I'll also be posting at the end of the week a round up of what I got so follow me on Bloglovin too!

Thursday, 28 November 2013

Review Thursday: Coconut Oil

Hey Guys,

Today I'm going to give my review on Coconut Oil. Now this isn't brand specific because the one above was quite expensive at £6.99 from Holland & Barrett which you can find here.  Although recently I found a cheaper one from TESCO which is primarily for cooking but makes me think if it's good enough to eat it must be good enough for my other needs.

I have been using coconut oil for about a month now for cooking, hair and skin. For cooking I use it for everything instead of Vegetable or Olive oil and it's great and makes food taste that little bit better. It's good and safe for fast high heat cooking, apparently it's better for you but I need to do more research on that.

Onto my beauty uses, I use it on my hair and skin. Coconut oil is suppose to be very hydrating for dry skin and hair but it can also promote hair growth.


I'll point out now I have very sensitive skin and after many wild diagnosis I have this rare form of 'folliculitis' (the doctors think!) which I've had for over 5 years, so I am very wary of what I can use on my skin. The oil is in a solid form but melts beautifully in the palms of your hands which just sinks into the skin. It can feel a little greasy when you use too much so it's trial and error of how much you need, but a little goes a long way.

When using Coconut oil on my skin, mostly on my legs and especially my shins. I started using the product after a shower to keep the moisture in my skin and really deeply hydrate it. After one use I was amazed my skin felt so soft and considering it is so dry and tight before I was amazed, since then I have used it everyday before going to bed. My skin is ultra soft and for the first time in years my skin condition seems to be improving! Absolute miracle! I'm not going to say it will work for everyone but give it a go and you may be happily surprised like me.


The third use is on my hair. I've been using this as a mask to try and hydrate my hair, my hair is very long and very thick so sometimes feels a bit worn. I got a small amount in my hands and gently melted it in my palms then smothered my hair, I also massaged it into my scalp. I then put it up in a towel and left it for several hours, I was going to leave it over night but I didn't have time the next day to wash it out. Although when I washed the oil out my hair instantly felt thicker, it was a little bit flat until the second wash but now it's feels so healthy and nourished. I have also read on the web that it promotes hair growth but that could be on regular use, so I'll have to update this if it has but I don't plan to use it everyday just weekly or every two weeks as a mask.


After reading more uses for Coconut oil I was amazed at how many useful beauty and medical tips there are. I strongly recommend getting your hands on some, for me it's amazing and it's quickly becoming my best friend.

I hope you've enjoyed reading how I use/ review on coconut oil and it's come in use for you. Please leave a comment below if you have any questions which I may have missed or if you've used it and have any helpful tips for me?